- Joined
- 14 Nov 2003
- Messages
- 479
Uncross Those Wires
Clean Up That Rat’s Nest & Better Your System’s Performance
(Courtesy of Computer Power User Magazine)
The inside of the Apple Power Mac G5 is as clean and sleek as the outside, thanks in part to great wire management.
Passionate PC enthusiasts are a finicky bunch, especially when it comes to their computers. They like things done a certain way, and nothing else will do. Take us, for example. The first thing we did when we recently took home a new Compaq laptop was reformat the hard drive and reinstall Windows XP our way, just so we knew it was done “right.” This same mindset permeates other aspects of computing, as well.
Crack open a computer system, and eight out of 10 times you’re likely to find a rat’s nest of cables and enough dust bunnies to start a breeding farm. Not only is this a virtual slap in the face to enthusiasts who really take pride in their systems, but it’s simply unsafe. Unsecured cabling is much more likely to come loose in transit, messy cables block airflow and hinder cooling efforts, and poorly placed cables can result in dust build-up, excessive vibration, and increased noise. Plus, a system with clean wiring simply looks better. Ask any Wintel fan if he likes the new Power Mac G5s, and you’ll likely be bombarded with a vehement argument belittling the Macintosh. However, that same Wintel fan probably drools over the G5’s immaculate internals.
Cable sheathing, heat-shrink tubing, wire ties, and adhesive wire tie mounts are some of the tools you can use to properly wire a case for cleanliness and maximum airflow.
To take a page from Apple’s playbook and properly wire a computer system for cleanliness and cooling performance, each individual cable requires your attention. There are also some basic tools necessary to fasten, secure, and bundle cables in strategic locations throughout your case. Consider nylon or Velcro wire ties, double-sided tape, and adhesive wire tie mounts absolute necessities. These are inexpensive, and you can find them in any decent electronics store. You may even find them in your local supermarket, pharmacy, or hardware store. Split-wire loom tubing, cable sheathing, and heat-shrink tubing are also useful tools that you can use not only to neaten the cables inside a system, but to increase their aesthetic value, as well. The most important tool of all is patience. Wiring a case properly is a relatively slow and painstaking process that requires some trial and error and a lot of planning. But the end result is well worth the effort.
You can thread wire ties through an adhesive wire tie mount to produce a loop that’s great for keeping cables securely in place.
Before you begin rewiring a system or building a system from scratch, it’s best to start with a clean slate. Remove all the components from the case, except the motherboard, if any have been installed, disconnect every cable, and remove all of the drives. Then, after some initial preparation, you can begin installing each component, one at a time, paying special attention to their placement and position with respect to the wires coming from the power supply and the data cables that will connect to the motherboard.
The Power Supply
The horde of cables coming from the power supply is arguably the toughest to maintain. There are so many wires of varying lengths and sizes that stem from a PSU that keeping them neat and secure can be tough. Start by untangling each individual strand of cables coming from the PSU. Then, starting from one end of the cable, use small wire ties placed about 1 to 2 inches apart to tightly bundle the individual groups of wires together. Doing so makes each strand leading from the power supply much more rigid, and it cleans up the wiring immensely. With each strand securely bundled, they are much easier to route throughout the case because they’ll conform to their bends much more readily, and they’ll look neater, too.
A little cable sheathing and heat-shrink tubing goes a long way to cleaning up the multitude of wires that lead to an ATX power connector.
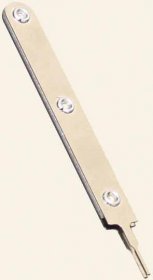
For a more finished look, a great alternative to wire tires is colored cable sheathing. Cable sheathing comes in a variety of colors and sizes and gives each individual cable a very clean look. It can be a bit difficult to install, however. Traditional cable sheathing requires the use of some specialized tools to remove the pins housed in each Molex connector and in the ATX power connectors coming from the PSU. Heat-shrink tubing shrunken over each end of the sheath holds the sheathing in place. You use the pin-removal tool to dislodge each individual pin from the connectors on a cable. With the connectors removed, you can slide pieces of heat-shrink tubing into place, followed by a length of sheathing, and then another piece of heat-shrink tubing. Then, using a heat gun or torch, you apply heat to the heat-shrink tubing to secure the ends of the sheathing.
If you attempt this process, make sure to keep track of each pin you remove from a connector and to put it back in its proper location. If you put a pin in the incorrect location, it could seriously damage your hardware when power is applied. We were lucky enough to have a presheathed PSU for our system build, but it may be worth the effort for systems that have a case window where the internals are exposed.
Once all of the wires coming from the PSU have been bundled or covered in sheathing, we find it’s best to route each cable individually, following the shortest path along the edge of the case as possible. We also like to use the space behind the PSU to hide excess cabling.
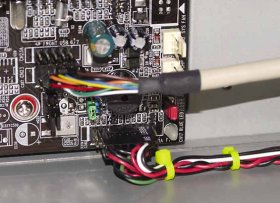
The tiny wires leading to an ATX case’s power switch, power LED, reset switch, IDE activity LED, and speaker look terrible when they’re not tied up neatly. Use small wire ties placed about an inch apart to create a clean, rigid bundle of wires that’s easy to route along the edge of your case.
Lights, Switches & Ports
Another group of unruly cables are the ones that lead to front-mounted ports, case lights, and switches. Generally, these are thin and relatively unobtrusive, but they need some attention to keep the inside of a system looking clean. Just about every case has leads for a power switch, a reset switch, a speaker, an IDE activity LED, and a power LED. To neaten these cables, start at the far end of the cable closest to the motherboard and use a wire tie to bundle the wires together and keep the small connectors in a tight bunch. Then, install wire ties about an inch apart, pulling the wires straight until you’ve worked your way through the entire length. Now route the bundled cables through your case so they’re out of the way and aren’t obstructing any components or fans. It’s sometimes helpful to use adhesive wire tie mounts to hold the cables in place. In our system we routed them along one corner and the bottom of the case so only a few inches of wire were clearly visible.
The cables leading from front-mounted ports also pose somewhat of a problem because the motherboard headers they connect to are usually located near the center of a motherboard and it’s difficult to keep them out of sight. Luckily, they’re usually equipped with a rubber sheath and are quite malleable. To keep these cables in check, a few wire ties and adhesive wire tie mounts will do. If you can’t hide these cables along the edge of your case, it is usually best to create as few “lines” as possible. For example, we connected the cable for our front-mounted USB ports and secured it in place so it formed a parallel line with the bottom of the case. Having as few intersecting lines as possible in plain view helps keep the overall impression of cleanliness intact.
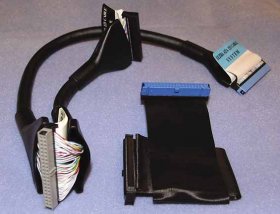
Which cable do you think would be easier
to route neatly in a cramped midtower case, the bulky rounded cable or the easy-to-fold ribbon cable to the right?
Component Placement
Just as important as where a cable is routed is where a component is placed. For example, don’t mount a CD/DVD drive in a bay that leaves no slack in the data cable to route it neatly through the case. The same holds true for floppy and hard drives. Before mounting them permanently, temporarily slide them into a bay and try to visualize the paths where you can route the data and power cables. You’ll find that certain drive bays are much more desirable because they’ll let you fold data cables in such a way that the connectors at each end will line up with the motherboard and drive easier. Also remember that strategic placement of a drive can help keep some cables out of sight. In our system, for example, the hard drive hides a large portion of the front-mounted USB cable and the small wires coming from the case LEDs and switches.
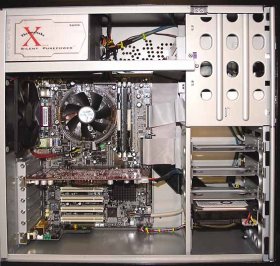
This Antec Sonata is equipped with a single hard drive, a DVD burner, a floppy drive, and an MSI GeForce FX 5900 XT that requires a supplemental power connector. The case’s front-mounted USB ports are also connected to the motherboard. With all of the power and data cables neatly folded and properly routed, the wiring is clean and doesn’t obstruct airflow at all.
continued in part 2.
Clean Up That Rat’s Nest & Better Your System’s Performance
(Courtesy of Computer Power User Magazine)
The inside of the Apple Power Mac G5 is as clean and sleek as the outside, thanks in part to great wire management.
Passionate PC enthusiasts are a finicky bunch, especially when it comes to their computers. They like things done a certain way, and nothing else will do. Take us, for example. The first thing we did when we recently took home a new Compaq laptop was reformat the hard drive and reinstall Windows XP our way, just so we knew it was done “right.” This same mindset permeates other aspects of computing, as well.
Crack open a computer system, and eight out of 10 times you’re likely to find a rat’s nest of cables and enough dust bunnies to start a breeding farm. Not only is this a virtual slap in the face to enthusiasts who really take pride in their systems, but it’s simply unsafe. Unsecured cabling is much more likely to come loose in transit, messy cables block airflow and hinder cooling efforts, and poorly placed cables can result in dust build-up, excessive vibration, and increased noise. Plus, a system with clean wiring simply looks better. Ask any Wintel fan if he likes the new Power Mac G5s, and you’ll likely be bombarded with a vehement argument belittling the Macintosh. However, that same Wintel fan probably drools over the G5’s immaculate internals.
Cable sheathing, heat-shrink tubing, wire ties, and adhesive wire tie mounts are some of the tools you can use to properly wire a case for cleanliness and maximum airflow.
To take a page from Apple’s playbook and properly wire a computer system for cleanliness and cooling performance, each individual cable requires your attention. There are also some basic tools necessary to fasten, secure, and bundle cables in strategic locations throughout your case. Consider nylon or Velcro wire ties, double-sided tape, and adhesive wire tie mounts absolute necessities. These are inexpensive, and you can find them in any decent electronics store. You may even find them in your local supermarket, pharmacy, or hardware store. Split-wire loom tubing, cable sheathing, and heat-shrink tubing are also useful tools that you can use not only to neaten the cables inside a system, but to increase their aesthetic value, as well. The most important tool of all is patience. Wiring a case properly is a relatively slow and painstaking process that requires some trial and error and a lot of planning. But the end result is well worth the effort.
You can thread wire ties through an adhesive wire tie mount to produce a loop that’s great for keeping cables securely in place.
Before you begin rewiring a system or building a system from scratch, it’s best to start with a clean slate. Remove all the components from the case, except the motherboard, if any have been installed, disconnect every cable, and remove all of the drives. Then, after some initial preparation, you can begin installing each component, one at a time, paying special attention to their placement and position with respect to the wires coming from the power supply and the data cables that will connect to the motherboard.
The Power Supply
The horde of cables coming from the power supply is arguably the toughest to maintain. There are so many wires of varying lengths and sizes that stem from a PSU that keeping them neat and secure can be tough. Start by untangling each individual strand of cables coming from the PSU. Then, starting from one end of the cable, use small wire ties placed about 1 to 2 inches apart to tightly bundle the individual groups of wires together. Doing so makes each strand leading from the power supply much more rigid, and it cleans up the wiring immensely. With each strand securely bundled, they are much easier to route throughout the case because they’ll conform to their bends much more readily, and they’ll look neater, too.
A little cable sheathing and heat-shrink tubing goes a long way to cleaning up the multitude of wires that lead to an ATX power connector.
For a more finished look, a great alternative to wire tires is colored cable sheathing. Cable sheathing comes in a variety of colors and sizes and gives each individual cable a very clean look. It can be a bit difficult to install, however. Traditional cable sheathing requires the use of some specialized tools to remove the pins housed in each Molex connector and in the ATX power connectors coming from the PSU. Heat-shrink tubing shrunken over each end of the sheath holds the sheathing in place. You use the pin-removal tool to dislodge each individual pin from the connectors on a cable. With the connectors removed, you can slide pieces of heat-shrink tubing into place, followed by a length of sheathing, and then another piece of heat-shrink tubing. Then, using a heat gun or torch, you apply heat to the heat-shrink tubing to secure the ends of the sheathing.
If you attempt this process, make sure to keep track of each pin you remove from a connector and to put it back in its proper location. If you put a pin in the incorrect location, it could seriously damage your hardware when power is applied. We were lucky enough to have a presheathed PSU for our system build, but it may be worth the effort for systems that have a case window where the internals are exposed.
Once all of the wires coming from the PSU have been bundled or covered in sheathing, we find it’s best to route each cable individually, following the shortest path along the edge of the case as possible. We also like to use the space behind the PSU to hide excess cabling.
The tiny wires leading to an ATX case’s power switch, power LED, reset switch, IDE activity LED, and speaker look terrible when they’re not tied up neatly. Use small wire ties placed about an inch apart to create a clean, rigid bundle of wires that’s easy to route along the edge of your case.
Lights, Switches & Ports
Another group of unruly cables are the ones that lead to front-mounted ports, case lights, and switches. Generally, these are thin and relatively unobtrusive, but they need some attention to keep the inside of a system looking clean. Just about every case has leads for a power switch, a reset switch, a speaker, an IDE activity LED, and a power LED. To neaten these cables, start at the far end of the cable closest to the motherboard and use a wire tie to bundle the wires together and keep the small connectors in a tight bunch. Then, install wire ties about an inch apart, pulling the wires straight until you’ve worked your way through the entire length. Now route the bundled cables through your case so they’re out of the way and aren’t obstructing any components or fans. It’s sometimes helpful to use adhesive wire tie mounts to hold the cables in place. In our system we routed them along one corner and the bottom of the case so only a few inches of wire were clearly visible.
The cables leading from front-mounted ports also pose somewhat of a problem because the motherboard headers they connect to are usually located near the center of a motherboard and it’s difficult to keep them out of sight. Luckily, they’re usually equipped with a rubber sheath and are quite malleable. To keep these cables in check, a few wire ties and adhesive wire tie mounts will do. If you can’t hide these cables along the edge of your case, it is usually best to create as few “lines” as possible. For example, we connected the cable for our front-mounted USB ports and secured it in place so it formed a parallel line with the bottom of the case. Having as few intersecting lines as possible in plain view helps keep the overall impression of cleanliness intact.
Which cable do you think would be easier
to route neatly in a cramped midtower case, the bulky rounded cable or the easy-to-fold ribbon cable to the right?
Component Placement
Just as important as where a cable is routed is where a component is placed. For example, don’t mount a CD/DVD drive in a bay that leaves no slack in the data cable to route it neatly through the case. The same holds true for floppy and hard drives. Before mounting them permanently, temporarily slide them into a bay and try to visualize the paths where you can route the data and power cables. You’ll find that certain drive bays are much more desirable because they’ll let you fold data cables in such a way that the connectors at each end will line up with the motherboard and drive easier. Also remember that strategic placement of a drive can help keep some cables out of sight. In our system, for example, the hard drive hides a large portion of the front-mounted USB cable and the small wires coming from the case LEDs and switches.
This Antec Sonata is equipped with a single hard drive, a DVD burner, a floppy drive, and an MSI GeForce FX 5900 XT that requires a supplemental power connector. The case’s front-mounted USB ports are also connected to the motherboard. With all of the power and data cables neatly folded and properly routed, the wiring is clean and doesn’t obstruct airflow at all.
continued in part 2.